
Installation Guide

Essential Tools and Materials for Installing Your Kitchen Hood
Before you begin installing your range hood, it’s important to gather all the necessary tools and materials to ensure a smooth and efficient installation process. With everything in place, you’ll avoid unnecessary delays and make the job much easier.
Here’s a comprehensive list of what you’ll need:
-
Screwdrivers (Flathead & Phillips): These are essential for tightening screws and securing the range hood in place.
-
Drill: A drill will help you create holes in the wall or ceiling for mounting the range hood and installing ductwork.
-
Measuring Tape: Accurate measurements are key to properly positioning and aligning your range hood.
-
Level: Ensuring the range hood is perfectly level is crucial for both aesthetic appeal and functionality.
-
Ductwork (for ducted range hoods): If you’re installing a ducted range hood, you’ll need appropriate ducting material to vent the air outside for top-notch filtration.
-
Screws & Wall Anchors: These are needed to securely mount your range hood to the wall or ceiling. Make sure you choose the right size based on your range hood and wall type.
-
Vent Cap (for ducted models): If your range hood vents air outside, a vent cap directs the airflow while preventing debris from entering the ductwork.
-
Electrical Tape (for wiring): Use electrical tape to secure any exposed wires and ensure a safe electrical connection. With the right tools and materials, you’ll be ready to tackle your stove hood installation with confidence. Follow these steps, and you’ll have your kitchen breathing fresh air in no time!
Pre-Installation Preparation for Your Range Hood
Proper preparation is essential for a smooth and efficient kitchen hood installation. By taking the necessary steps beforehand, you’ll set yourself up for success and ensure optimal performance. Here’s how to prepare:
1. Check Compatibility
Before you begin, it’s crucial to ensure your vent hood is compatible with your kitchen space and meets the required ventilation needs. Measure the installation area to verify that the hood will fit comfortably.
2. Turn Off Power
Safety should always be your top priority when handling electrical wiring. Before installation, be sure to turn off the power supply at the circuit breaker. This will eliminate any electrical hazards while you work with the wiring of your vent hood.
3. Measure and Mark Installation Points
Correct placement is key to maximizing the performance and efficiency of your kitchen hood. Use a measuring tape to mark the mounting points, double-checking that the height is appropriate and the unit will be level when installed.
4. Determine Ductwork (for Ducted Models)
If you’re installing a ducted range hood, planning the ductwork is essential for proper air venting. Depending on your kitchen, you’ll need to route the ducting to vent the air outside or consider a recirculating model if external venting isn’t possible. Ensure that your ductwork is long enough to reach the outside vent or, for recirculating models, make sure the right filters are in place for effective filtration.
By following these pre-installation steps, you’ll ensure a successful installation, providing your kitchen with enhanced ventilation and a cleaner, more comfortable cooking environment.
Step 1
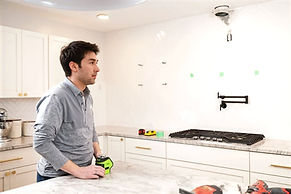
Preparing the Wall for the Kitchen Hood Installation
At this stage, the mounting location for the hood is determined. The installer uses a laser level for precise alignment and marks the wall where the brackets will be secured. The mounting brackets are already in place, and the ventilation duct is prepared for connection. The electrical wiring is also set up for the exhaust unit. Before proceeding with the installation, it is crucial to ensure that all fastenings are securely fixed and that the measurements align with the selected kitchen hood model.
Step 2

Attaching the Main Body of the Range Hood
At this stage, the installer is securing the main body of the kitchen hood. The structure is carefully positioned against the wall, aligning with the marked guidelines. Green painter’s tape with measurements or notes helps ensure precise placement. The installer uses screws to fasten the hood body to the wall and cabinetry, making sure it is level and properly anchored. This step is crucial as it forms the foundation for the final appearance and functionality
Step 3
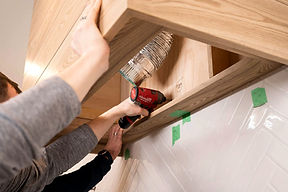
Securing the Main Body of the Range Hood
In this step, the installer is firmly securing the main body of the range hood to the wall and cabinetry using a power drill. The hood is carefully held in place while screws are driven into pre-marked positions. The ductwork is also being adjusted to ensure a proper fit. Attention to alignment and stability is crucial at this stage, ensuring that the hood is securely mounted and ready for the next installation steps.
Step 4
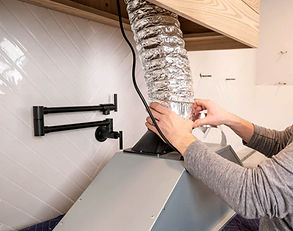
Connecting the Vent Duct to the Hood
At this stage, the installer is attaching the flexible aluminum duct to the vent outlet on the range hood. This connection is crucial for proper ventilation, ensuring that smoke, grease, and odors are efficiently directed outside. The duct is being secured tightly to prevent air leaks, using either metal tape or a clamp. Ensuring a snug fit is essential for the hood’s optimal performance.
Step 5
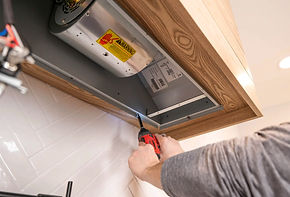
Securing the Range Hood Insert
In this step, the installer is fastening the range hood insert into the custom wooden enclosure. Using a drill, he secures the insert with screws, ensuring a stable and flush fit. Proper alignment is key to prevent vibrations and ensure efficient operation. The insert houses the motor and other essential components, making this step crucial for the hood’s overall performance and longevity.
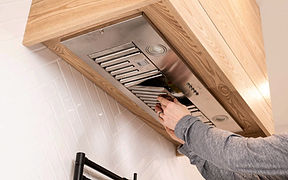
Step 6

Fixing the exhaust module
At this stage, the master captures the exhaust block inside the decorative casing. A screwdriver is used to reliably attach the panel and ensure the stability of the structure. It is important that all the fasteners are tightened evenly to avoid vibrations and noise during the operation of the hood. You should also make sure that the panel fit tightly to the case, creating a neat appearance.
Step 7
Installation of filters and final check
At the final stage, metal filters are installed, which ensure the effective operation of the hood, delaying fat and pollution. The filters are neatly inserted into the intended grooves so that they are tightly fixed.
After installing all the components, the final check is carried out:
Extrust power is turned on.
The fan operation at different speeds is checked.
Lighting is tested.
It is convinced that the filters are correctly installed and do not rattles when working.
Now the hood is completely ready for operation! 🎉